Configuration setup
Several of our OTA tested configs are present in the configs folder. OCUDU supports all 3GPP Release 17 bands, the following parameters need to be changed to braodcast at a specific band.
USRP configuration
The ru_sdr block configures the SDR-based radio unit. For USRP-based deployments, OCUDU uses the UHD driver to communicate with the radio hardware.
The example below uses an X300/X310-class USRP with a 30.72 MS/s sampling rate.
ru_sdr:
  device_driver: uhd
  device_args: type=x300
  clock: default           # Supported: [default, internal, external, gpsdo].
  sync: default            # Supported: [default, internal, external, gpsdo].
  srate: 30.72
  tx_gain: 25
  rx_gain: 25
The device_args field should match the connected USRP type. For example, X300/X310 radios commonly use type=x300, while other USRP platforms may require different UHD device arguments.
The srate value must be compatible with the selected channel bandwidth and numerology.
The clock and sync options control the reference and timing sources used by the USRP. For a single-radio setup, the default or internal clock is usually sufficient.
For multi-radio experiments, external synchronization through a 10 MHz reference and PPS source, such as an OctoClock or GPSDO, is recommended to maintain timing and frequency alignment across devices.
The tx_gain and rx_gain values may need tuning depending on the antenna, RF front-end, cable loss, and target coverage area. Very high transmit gain can cause distortion or saturation, while very low gain may result in poor UE attachment or weak received signal strength.
Cell configuration
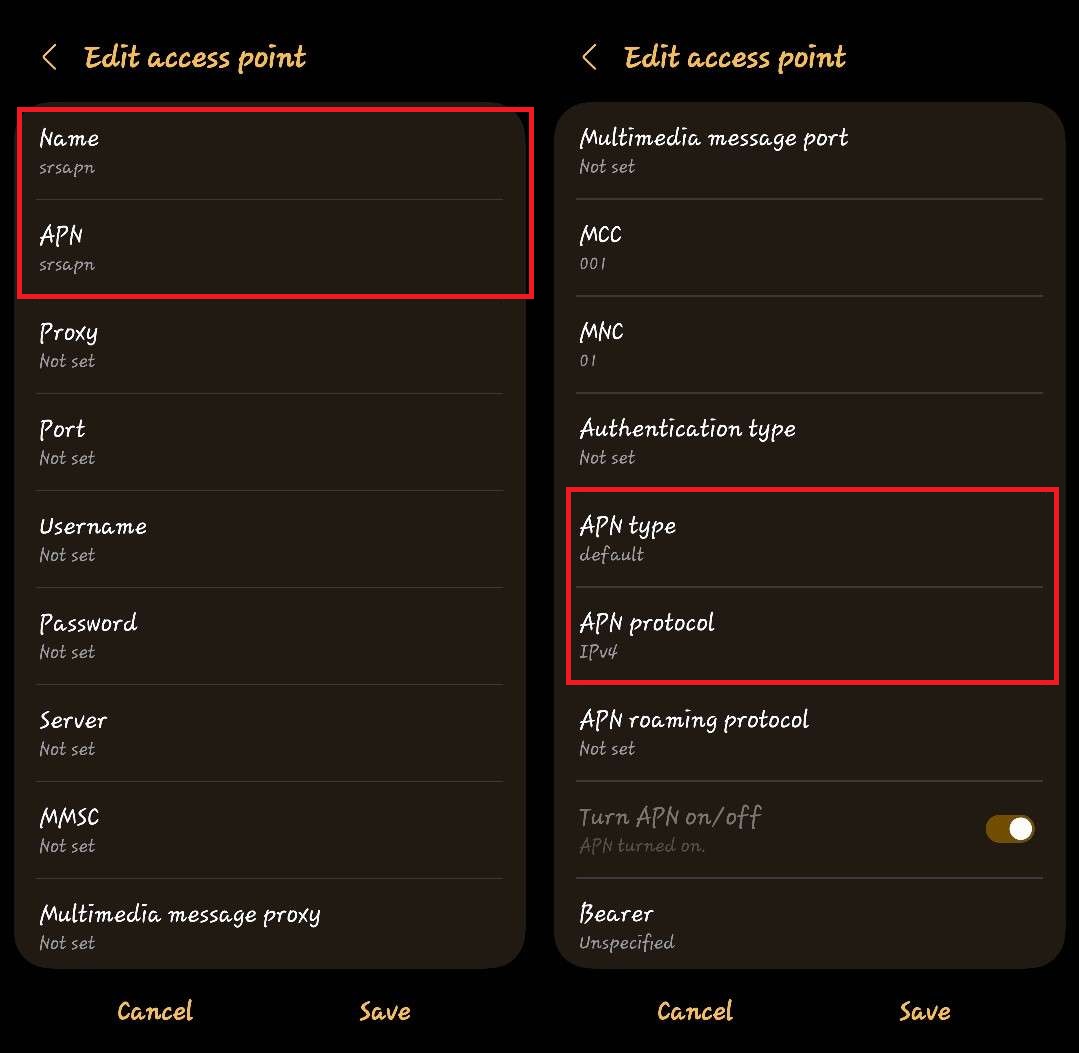
The transmission band can be changed under the cell_cfg block. Refer to the NR band table at sqimway to verify that the selected band, ARFCN, bandwidth, and subcarrier spacing are valid for the intended deployment.
cell_cfg:
dl_arfcn: 636666 # Required UINT, sets the Downlink ARFCN.
band: 78 # Optional TEXT - auto
channel_bandwidth_MHz: 30
common_scs: 30
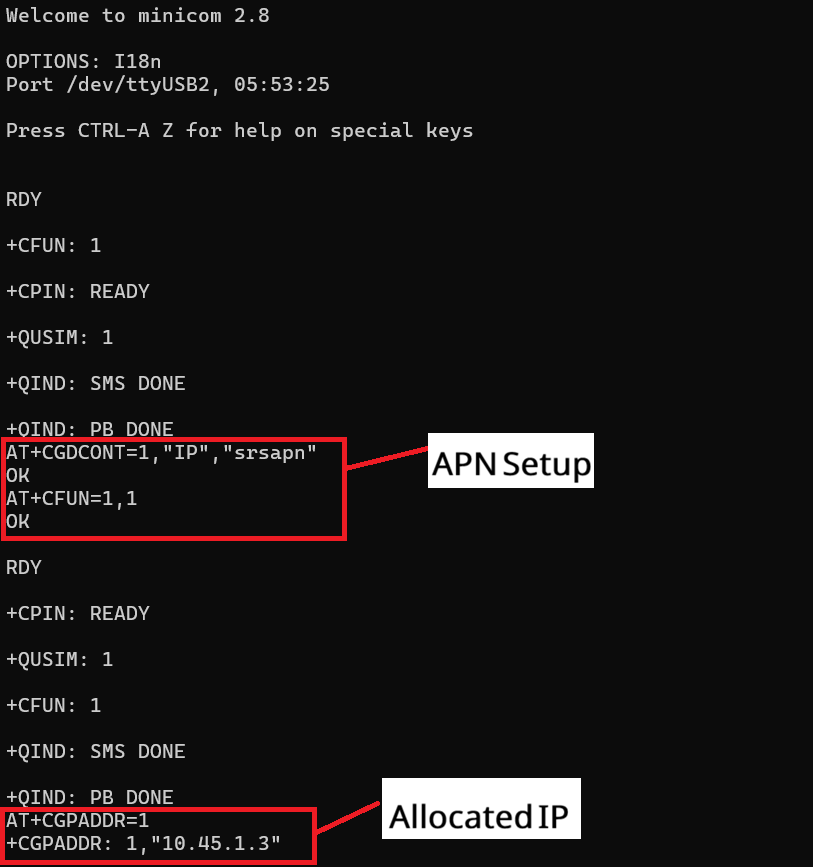
plmn: "00101"
tac: 7
pci: 1
The dl_arfcn determines the downlink carrier frequency, while band selects the corresponding NR operating band. The channel_bandwidth_MHz and common_scs fields define the bandwidth and numerology used by the cell. These values must be consistent with the selected NR band and supported by the SDR sampling rate.
O-RAN E2 Connection
The e2 block enables the O-RAN E2 interface between the OCUDU gNB and the near-RT RIC. This allows the gNB to expose RAN information and control interfaces to xApps running on the RIC.
e2:
  enable_du_e2: true               # Enable DU E2 agent (one for each DU instance)
  enable_cu_cp_e2: true            # Enables the CU E2 agent for CU-CP
  enable_cu_up_e2: true            # Enables the CU E2 agent for CU-UP
  e2sm_kpm_enabled: true           # Enable KPM service module
  e2sm_rc_enabled: true            # Enable RC service module
  e2sm_ccc_enabled: true           # Enable CCC service module
  addr: 192.168.50.103             # RIC IP address
  bind_addr: 192.168.50.38         # A local IP that the E2 agent binds to for traffic from the RIC. ONLY required if running the RIC on a separate machine.
  port: 32222                      # RIC port
The DU, CU-CP, and CU-UP E2 agents can be enabled depending on which parts of the gNB should communicate with the RIC. The DU E2 agent is commonly used for lower-layer RAN measurements and control, while the CU-CP and CU-UP agents expose control-plane and user-plane related information.
The service model options define which E2 service models are advertised to the RIC. KPM is used for key performance measurements, RC supports RAN control procedures, and CCC enables additional control-related capabilities when supported by the deployment.
The addr field should point to the near-RT RIC E2 termination IP address. The bind_addr should be set to the local interface IP of the machine running OCUDU, especially when the RIC and gNB are deployed on different hosts. The port must match the E2 termination service port exposed by the RIC. On the same host the addr and port field will be the corresponding cluster ip addresses.
Metrics and Packet monitoring
OCUDU supports runtime metrics reporting and packet capture for different protocol layers. These options are controlled directly from the gNB configuration file. To enable monitoring, set the required metric or PCAP flags to true and restart the gNB with the updated configuration.
For metrics, enable JSON reporting and select the layers that should be monitored. The remote_control block exposes the metrics service over the configured IP address and port.
For example, setting bind_addr: 0.0.0.0 allows the metrics endpoint to be accessed from other machines on the same network, while port: 8001 defines the service port. This is also the endpoint used by the CN launch with the Grafana dashboard to collect and visualize OCUDU metrics.
metrics:
  autostart_stdout_metrics: false       # Optional BOOLEAN (false). Sets whether or not to autostart stdout metrics reporting. Supported [false, true].
  enable_json: false                    # Optional BOOLEAN (false). Enables JSON metrics reporting.
  enable_log: false                     # Optional BOOLEAN (false). Enables log metrics reporting.
  enable_verbose: false                 # Optional BOOLEAN (false). Enables extended detail metrics reporting.
  layers:
    enable_app_usage: false             # Optional BOOLEAN (false). Enables application usage metrics.
    enable_ngap: false                  # Optional BOOLEAN (false). Enables NGAP metrics.
    enable_e1ap: false                  # Optional BOOLEAN (false). Enables E1AP metrics.
    enable_pdcp: false                  # Optional BOOLEAN (false). Enables PDCP metrics.
    enable_rrc: false                   # Optional BOOLEAN (false). Enables RRC metrics.
    skip_cu_up_executor: true           # Optional BOOLEAN (true). Whether to skip logging CU-UP executor metrics when executor logging is enabled application wide.
    enable_sched: true                  # Optional BOOLEAN (true). Enables DU scheduler metrics.
    enable_rlc: false                   # Optional BOOLEAN (false). Enables RLC metrics.
    enable_mac: false                   # Optional BOOLEAN (false). Enables MAC metrics.
    enable_executor: false              # Optional BOOLEAN (false). Whether to log application executors metrics.
    enable_du_low: false                # Optional BOOLEAN (false). Enables DU low metrics (upper physical layer).
    enable_ru: false                    # Optional BOOLEAN (false). Enables Radio Unit metrics.
  periodicity:
    app_usage_report_period: 1000       # Optional UINT (1000). Application resource usage metrics report period in milliseconds.
    cu_cp_report_period: 1000           # Optional UINT (1000). CU-CP metrics report period in milliseconds.
    cu_up_report_period: 1000           # Optional UINT (1000). CU-UP metrics report period in milliseconds.
    du_report_period: 1000              # Optional UINT (1000). DU statistics report period in milliseconds. Supported: [0 - 10485760].
    executors_report_period: 1000       # Optional UINT (1000). Executors metrics report period in milliseconds. Supported: [0 - 10485760].
remote_control:
  bind_addr: 0.0.0.0
  port: 8001
  enabled: true
pcap:
  ngap_filename: /tmp/gnb_ngap.pcap         # Optional TEXT (/tmp/gnb_ngap.pcap). Path for NGAP PCAPs.
  ngap_enable: false                        # Optional BOOLEAN (false). Enable/disable NGAP packet capture. Supported: [false, true].
  n3_filename: /tmp/gnb_n3.pcap             # Optional TEXT (/tmp/gnb_n3.pcap). Path for N3 PCAPs.
  n3_enable: false                          # Optional BOOLEAN (false). Enable/disable N3 packet capture. Supported: [false, true].
  e1ap_filename: /tmp/gnb_e1ap.pcap         # Optional TEXT (/tmp/gnb_e1ap.pcap). Path for E1AP PCAPs.
  e1ap_enable: false                        # Optional BOOLEAN (false). Enable/disable E1AP packet capture. Supported: [false, true].
  e2ap_cu_cp_filename: /tmp/cu_cp_e2ap.pcap # Optional TEXT (/tmp/cu_cp_e2ap.pcap). Path for E2AP CU-CP PCAPs.
  e2ap_cu_up_filename: /tmp/cu_up_e2ap.pcap # Optional TEXT (/tmp/cu_up_e2ap.pcap). Path for E2AP CU-UP PCAPs.
  e2ap_du_filename: /tmp/du_e2ap.pcap       # Optional TEXT (/tmp/du_e2ap.pcap). Path for E2AP CU PCAPs.
  e2ap_enable: false                        # Optional BOOLEAN (false). Enable/disable E2AP packet capture. Supported: [false, true].
  f1ap_filename: /tmp/gnb_f1ap.pcap         # Optional TEXT (/tmp/gnb_f1ap.pcap). Path for F1AP PCAPs.
  f1ap_enable: false                        # Optional BOOLEAN (false). Enable/disable F1AP packet capture. Supported: [false, true].
  f1u_filename: /tmp/gnb_f1u.pcap           # Optional TEXT (/tmp/gnb_f1ap.pcap). Path for F1AP PCAPs.
  f1u_enable: false                         # Optional BOOLEAN (false). Enable/disable F1AP packet capture. Supported: [false, true].
  rlc_filename: /tmp/gnb_rlc.pcap           # Optional TEXT (tmp/gnb_rlc.pcap). Path for RLC PCAPs.
  rlc_rb_type: all                          # Optional TEXT. Sets the RLC PCAP RB type. Supported: [all, srb, drb].
  rlc_enable: false                         # Optional BOOLEAN (false). Enable/disable RLC packet capture. Supported: [false, true].
  mac_filename: /tmp/gnb_mac.pcap           # Optional TEXT (/tmp/gnb_mac.pcap). Path for MAC PCAPs.
  mac_type: udp                             # Optional TEXT (udp). Sets the MAC PCAP pcap type. Supported: [DLT or UDP].
  mac_enable: false                         # Optional BOOLEAN (false). Enable/disable MAC packet capture. Supported: [false, true].
GNB Deployment
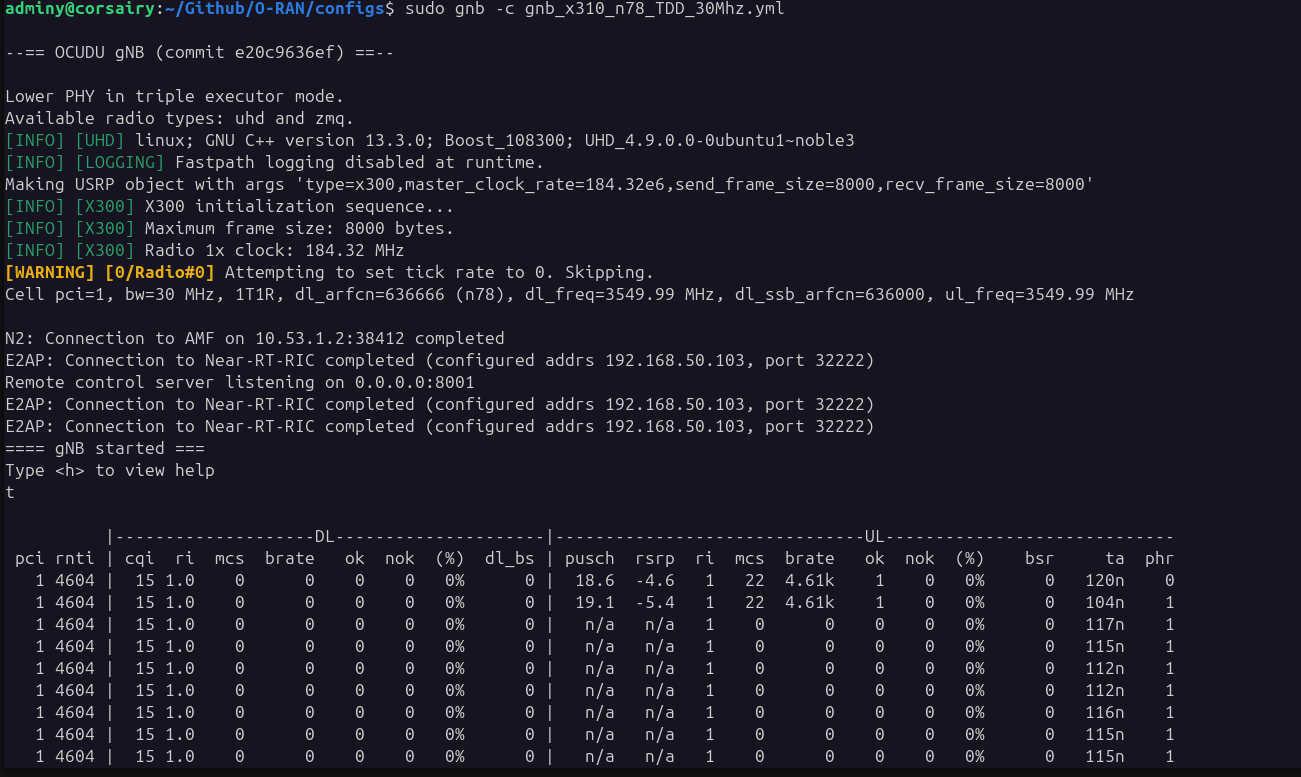
After changing the relevant parameters execute the gNB
sudo gnb -c <path-to-your-config>
# e.g. sudo gnb -c gnb_x310_n78_TDD_30Mhz.yml
Private cellular transmissions may be regulated in your region. Use low-power indoor deployments for testing, and avoid high transmit power or outdoor operation unless authorized, as this may interfere with licensed networks.
Expert Configuration
OCUDU fills many omitted configuration parameters with built-in defaults, so most basic deployments only require the main radio, cell, core network, and E2 settings. This keeps the configuration lightweight for standard testbed bring-up.
For more advanced experiments, OCUDU also supports detailed control over scheduler behavior, slicing policies, slot allocation, TDD patterns, and other RAN parameters. These options are useful when tuning the gNB for specific traffic profiles, uplink/downlink balance, latency requirements, or controlled research experiments.
For the full list of supported parameters and default values, refer to the complete OCUDU Configuration Reference.